David Cordero
Side Project: Building a SBB Stationboard
Published on 21 May 2025
If you have ever been to Switzerland, or if you are currently living here, you have most likely seen some of the station boards present in every SBB (Swiss Federal Railways) train station.
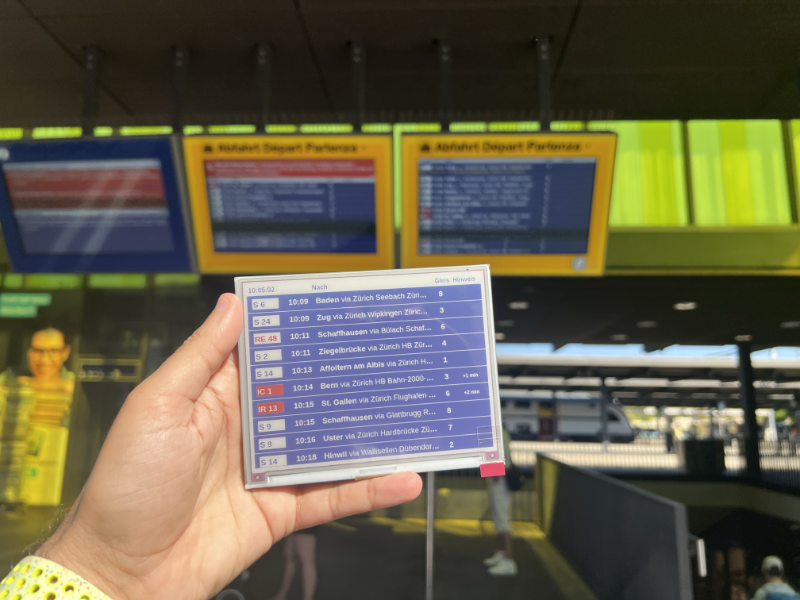
These station boards are very useful as they allow you to quickly find your train along with its main relevant information, such as the specific platform it departs from, or additional information such as delays or cancellations.
And that delay information is key for this project, as it has happened to me multiple times that I had run to the station thinking that I was about to miss my train, to then discover on the station board that the train was actually delayed by 3 or 5 minutes.
Every time this happened, I thought, “Wouldn’t it be great if I had known that beforehand by having my own station board at home to check the trains?”
The Application
Building the application was quite straightforward, as all the information about trains in Switzerland is openly available through the Transport API and the API is actually very well documented, even providing useful examples.
Even though this is a fairly simple website that could have been built without any framework, I opted to use Angular because it’s the framework I’ve been using lately. I like it so far and with this project I wanted to gain some experience building something real with it.
The application consists of three different components:
- 👋 Welcome Page, just showing the icon and name of the project.
- ⚙️ Setup Page, where the user can configure the actual train station, the number of results to be displayed in the stationboard and an optional offset time in case it takes you some time to reach the train station.
- 🚂 Stationboard, with all the information about the trains departing from the selected station.
You can find the application available here: SBB-Stationboard, and in case you are interested, you can also find the source code available here: SBB-Stationboard repository
The Infrastructure
For the infrastructure of the project I opted for using the following components:
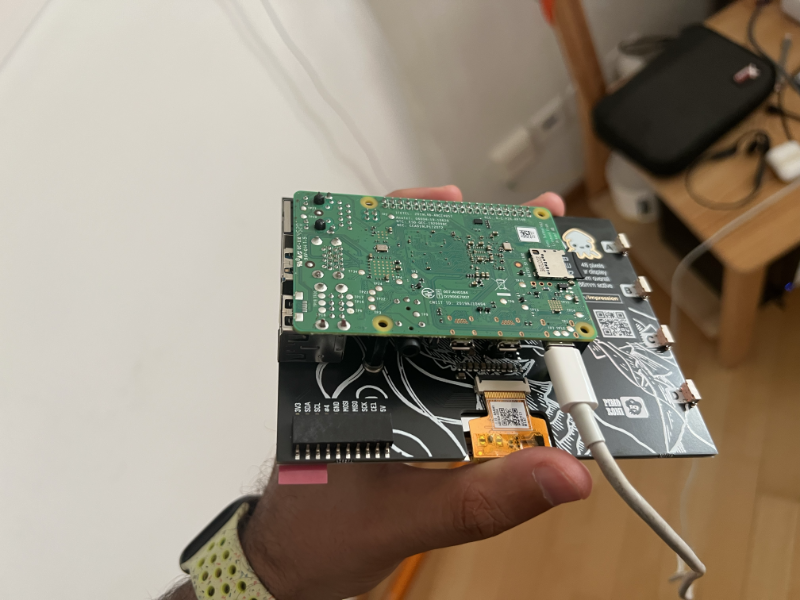
- 📺 Inky Impression 5.7” 7 colour
I opted for an e-ink display because my goal was to keep the station board available 24/7, and I didn’t want a screen emitting light constantly at home, specially at night.
This display can be easily connected to a Raspberry through the GPIO interface and offers excellent quality with beautiful colors perfect for this project. As I wanted something similar to the displays used in actual train stations with the same color scheme this screen was a perfect match.
Of course, using e-ink introduced some limitations since it doesn’t behave like a typical system display, so I had to adjust my project to accommodate these constraints.
- 💻 Raspbery Pi 4b
Although this project would probably be better suited for a Pi Zero due to its lower energy consumption and smaller size, I decided to use the Raspberry Pi 4b since I already had one at home running some self-hosting services such as Homer, Pi-Hole, or a custom VPN Server.
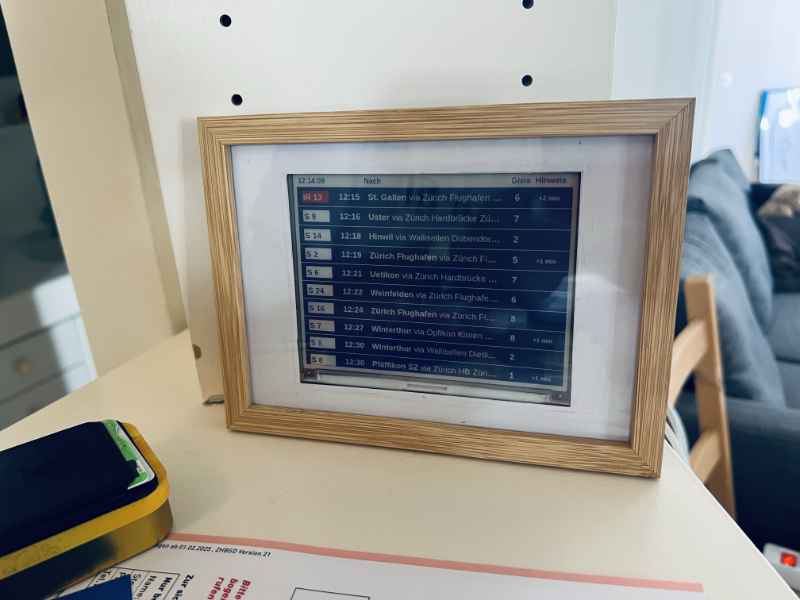
- 🖼️ A Frame
A wooden frame that I got from a shop next to my place. After some crafting work using a ruler, cardboard and a cutter, I made it suitable for this project.
The Integration
The integration of the application in this infrastructure was not straightforward as the e-ink screen came with the limitations of not behaving as a system display. Instead this screen comes with a Python library that allows you to draw on it.
With that strong limitation, which means having no web browser to show my application, I only had two options:
- 👨💻 Reimplement my application using this Python library provided by Pimoroni (the manufacturer of the display)
- 🧠 Try to find some creative solution to make my web app run on this display
As I didn’t want to reimplement the application, I started exploring the possibilities of the API provided by the screen, and I found that it can easily display images, which reduced my problem to just having to get a screenshot image of my application that I could then send to the screen.
Best part is that generating this screenshot is actually quite simple by using using either firefox or chromium in headless mode with a simple command, which in the case of Zurich HB station with 5 minutes of offset to reach the train station, would look something like this:
chromium --virtual-time-budget=5000 \
         --headless \
         --window-size=600,448 \
         --disable-gpu \
         --screenshot=dashboard.png \
         --full-page \
         https://sbb-stationboard.netlify.app/stationboard/8503000\?timeOffset\=5
So, at the end it was just a matter of creating a bash script that generated the screenshot like this, and then uses the API of the screen to draw it.
To get regular updates of the dashboard, I added this script as a cronjob that is triggered every minute:
# m h dom mon dow command
* * * * * /home/pi/scripts/updateDashboard.sh
The Result
With all these components working together, here’s what the final station board looks like:
Conclusions
I believe that the world is divided between doers and consumers, and even though becoming a consumer is always tempting because it requires less effort, I try to constantly stay in the first group because I know it ultimately makes me happier.
This is basically one of the reasons why I created this project. I had the idea and went for it just going through a series of humble steps until I got a working prototype.
Of course, things could have been done better or could be improved, but that’s not the point. The point is that I enjoyed doing this simple project and I learned some interesting things along the way.
And all of that, made me happy.